
12. DESERT OVERLAYS
12.1 [Note: Many of the following rules do not apply to Overlays X1 and E1. See 12.43 and 12.5 before cutting out these two overlays.] A number of overlays have been included in WEST OF ALAMEIN. Each must be cut out before it can be used. When doing so, cut just inside ,the edges of the overlay's exterior hexsides. This is important because, along the exterior edge of the overlay, only the mapboard's hexsides and vertices matter for rules purposes. The overlays contain no hex coordinates, but the front of each multi-hex overlay contains a small "1" in one hex and a small "2" in an adjacent hex; these numbers are used to orient the overlay on its board. Pressing a few small pieces of plastic adhesive (such as PLASTI-TAK© or PLAS-TIC©, which are usually available where office/
 12.2 SSR PLACEMENT: When a SSR calls for the use of one or more overlays, it will specify the board on which it will go and, if a multi-hex overlay, will also list the coordinates of two adjacent hexes that determine the overlay's orientation. The first hex listed is covered by the overlay hex that contains the "1", and the second is covered by the overlay hex that contains the "2". On the scenario card, the "board configuration" will contain the overlay's ID in its approximate placement location.
EX: A SSR states "Place Overlay H1 on 27H6-G7". The hex of Overlay H1 that contains the 1 is therefore placed over hex 27H6, and that containing the "2" is placed over hex G7.
12.4 SPECIAL CONSIDERATIONS: Some overlays require further rules for placement/
12.41 WADIS: If the "end-hex" of a wadi overlay is adjacent to another wadi (whether the latter is an overlay or not), or if two wadi "end-hexes" (whether overlay hexes or not) are on different boards but are adjacent to each other, all hexsides common to both such wadi hexes are treated as wadi hexsides (i.e., the two wadis are treated as one continuous wadi) except where a wadi cliff is present.
12.421 D6: Overlay D6 contains a non-Lip hex that is also a sand (7.) hex distinguishable by its darker yellow color. This hex is treated as normal Open Ground if Broken/
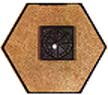
 12.43 X1: Overlay X124 represents a tight cluster of Single-Story stone buildings, completely surrounded by cliffs. The TEM of these buildings is +4. However, all Small Arms fire from this Location to another hex is halved as Area Fire prior to all other modification. When cutting out X1, cut along the outer edge of the cliff artwork.
 12.44 X2: Overlay X2 represents a Single-Story stone mausoleum building. Its TEM is +1; however, if its Location is Encircled (A7.7), this TEM is reduced to zero. It is not considered a building for rally/
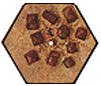 12.45 X3: Overlay X3 represents the tents of a Bedouin camp. It is treated exactly like in-season Grain except that it is Inherent Terrain (B.6) and has an entry cost of one MF/
12.46 X4 & X5: Overlays X4 and X5 each represent a cluster of normal, Single-Story stone buildings.
12.5 ESCARPMENT: The large overlay whose ID is "E1" represents part of an escarpment25. When cutting out E1, cut along the outer edges of the cliff artwork and as given in the instructions printed on the overlay sheet; otherwise, cut inside the exterior hexsides as given in 12.1. This overlay is used only on board 25, and is positioned on it as per A2.7. When placed, the terrain rises from Level 0 on board 25 to Level 4 on the overlay - and if another board is butted against the long Level 4 edge of the overlay, this added board is also at Level 4. If the hexsides printed on E1 do not align properly with those on the mapsheet, crease the overlay along its fold line to follow the depressed contour of the mapsheet fold. This will shorten the overlay's length to match the mapsheet's.

Partial cross section of hexrow R, board 25, with Overlay E1 in place
12.51 MF/
 EX: A truck moving from 25M8 to L7 expends eight MP (4 [ascend a level] + 4 [Chapter-B Open Ground] = 8). However, if moving from M7 to L7 it expends five MP (4 [ascend a level] + 1 [Desert Open Ground] = 5). If moving from L7 to M7 - or if moving from M8 to M7 - it expends seven MP (6 [enter wadi] + 1 [Desert Open Ground] = 7). If moving from L7 to M8 it expends four MP (Chapter-B Open Ground).
12.52 SCRUB: When using Overlay E1, treat all brush on board 25 as scrub unless Broken Terrain (13.1) is in effect.

