
9. WALLS & HEDGES

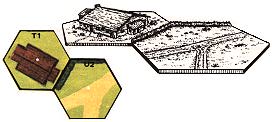
9.1: A wall represents a stone fence varying in height between one and two meters, and conforms to hexsides rather than the interior of a hex. Any hexside that overprints a thick gray line such as 2E4-E5 is a wall hexside. A hedge represents hedges one to two meters high and also conforms to hexsides. Any hexside containing a thick green line such as 2Tl-U2 is a hedge hexside. The thick terrain depiction, as well as the hexside itself (inclusive of vertices), represents the wall/
 EX: An attack from 6Y6 to Z7 is affected by the hedge hexside Y7-Z7 even though the hedge depiction does not actually extend to the vertex.
9.2 LOS: Wall and hedge hexsides are Half-Level obstacles to same-level LOS (A6.21) unless the wall/
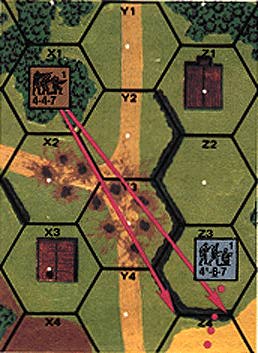
EX: In the 9.1 illustration (to the right), the 4-4-7 in 6Z9 can attack the 8-3-8 in X6 with a +2 DRM for the wall because both intervening wall/
 9.21 ENTRENCHMENTS: A unit in an entrenchment cannot see (or be seen) across a same-level wall/
EX: If the 4-6-7 in 3Z3 were beneath a foxhole, no LOS would exist between the 4-6-7 and the 4-4-7 in X1, but the 4-4-7 would still have LOS to the foxhole, thus revealing it if hidden.
9.3 TEM: The TEM of a wall is +2; the TEM of a hedge is +1. Fire traced through a wall/
9.31 The wall/
 9.32 WALL ADVANTAGE (WA): A unit may claim WA over a same level wall/
A unit claiming WA is still considered occupying any obstacle/
9.321 A unit always has WA over all possible (as per 9.32) wall/
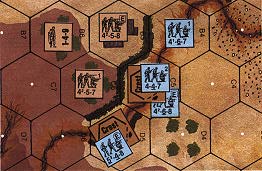
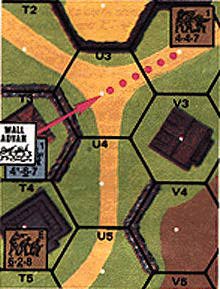 EX: The 4-6-7 occupies 3T3 before the 4-4-7 moves ADJACENT to it in U3. If the 4-6-7 First Fires at the moving 4-4-7 as the latter enters U3 it may do so using FFMO and no wall TEM because (vs an adjacent firer) the Wall TEM does not apply to a unit entering a hex if that firer qualifies for Wall Advantage. Assuming the 4-4-7 survives that attack, its AFPh attack vs the 4-6-7 will be affected by the +2 TEM of the wall because the German retains the Wall Advantage, but the hexside TEM of a target hex is not cumulative with that of the other terrain in the same hex so the building +2 TEM does not also apply. However, if T3 could be fired on along a LOS that did not cross the wall hexside (e.g., from T4), the German might choose to use the building +2 TEM rather than the non-applicable wall +2 TEM. If he does (or if for any reason he chooses the building TEM rather than the wall TEM), the German loses the "Wall Advan" counter (9.31) and, if the Russian unit is adjacent, the "Wall Advan" counter automatically shifts across the wall hexside to the ADJACENT Good Order 4-4-7. On the other hand, if the 4-6-7 chooses to keep Wall Advantage it would be considered in Open Ground to any fire from the 6-2-8. A unit in V4 may not claim Wall Advantage because it is at a higher elevation than the wall hexside (9.35).
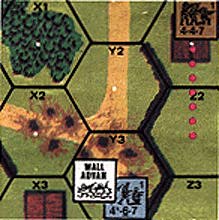 EX: The 4-6-7 in 3Y3 has Wall Advantage over the 4-4-7 that has just entered Z2. If another German unit enters Y2 or Y3 it will also qualify for Wall Advantage, because the Russian cannot claim the hedge TEM of either common hexside (since it does not have Wall Advantage over it). The Russian unit cannot "steal" Wall Advantage from either unit as long as the other retains Wall Advantage in the adjacent hex. Because the 4-6-7 has claimed Wall Advantage, it cannot also claim Shellhole TEM without losing the Wall Advantage. If the 4-6-7 fires as a FG with another unit in X2 at the 4-4-7 in Z2, the hedge TEM would apply (A.5).
9.322 A unit claiming WA must always be marked with a "Wall Advan" counter. Placing a "Wall Advan" counter and claiming WA are synonymous, as are removing a "Wall Advan" counter and forfeiting WA [EXC: 9.323]. A Pinned, TI, or Immobile unit cannot voluntarily claim or forfeit WA. Claiming WA is voluntary [EXC: 9.323], and can be done by a unit at five times: during its setup; at the end of any RPh (step 1.32B of ASOP, ATTACKER first); during its MPh/
9.323 MANDATORY WA: A unit unable to claim in-hex TEM of at least +1 must claim WA as soon as possible regardless of timing (even if having in-hex Hindrance), and cannot voluntarily forfeit it [EXC: 9.324]. Neither Emplacement, Gunshield, Height Advantage, nor a friendly AFV with WA are considered to provide an in-hex TEM for this purpose. A "Wall Advan" counter is not necessary in this case, unless there is an enemy unit sharing one or more of the unit's wall/
9.324 CONCEALMENT: A concealed unit (or dummy stack) may claim WA, but a dummy stack cannot prevent a non-dummy enemy unit from claiming WA over shared wall/
9.33 ELEVATION EFFECTS: If a non-Aerial firer is at an elevation above the wall/
 EX: The 4-6-7 on level 2 of 12O7 can ignore the hedge when firing into O8 because its level 2 height is > the one-hex distance to the target. However, if the 4-6-7 fires on P8, it must still add a +1 hedge TEM because its level 2 height is not > the distance (two hexes). A unit on the first level of O7 firing into O8 would still have to add a +1 hedge TEM because it is not a full level higher than the Half-Level obstacle and its elevation (1) is not > the range (1). The TEM of a unit entrenched in P7 would be reduced to +1 for attacks by the 4-6-7 at level 2.
9.34 INDIRECT FIRE: The TEM of a wall/
9.35 A wall/
EX: Fire against a 4-4-7 in 41R4 (Level 1) would not be affected by the Q5-R4 hexside (Half-Level obstacle on level 0), nor by the P4-R4 hedge hexspine, but a unit in P4 could claim hedge TEM if attacked from R4 due to the P4-R4 hexspine.
 EX: The 4-6-7 with WA in 41Q5 cannot deny the 5-2-7 in P4 WA (over O4-P4) since the two units do not share any wall/
It is the Russian PFPh, and the 5-2-7 declares an attack (with no TEM). The 4-6-7 would not be able to forfeit WA and claim building TEM until after the attack has been resolved. After having thusly forfeited WA, the 4-6-7 may choose between the building and hedge TEM if fired on from P6 and R6, but must use the building TEM if fired on from the 4-4-7 (assuming the 4-4-7 now has WA) even though Q5-Q6 is a hedge hexside, since a unit without WA may only use wall/
Assume the 4-6-7 retained WA and survived Prep Fire. When the 4-4-7 moves to P5, the 4-6-7 denies it WA and First Fires on it using FFMO and no TEM because the hedge TEM is NA vs a firer with WA over that hexside. If the 4-6-7 fires as a FG with the 4-6-8 in R5, the hedge TEM applies (A.5).
 During the next German MPh, the 4-6-8 moves from R5 to Q6 and although it could claim WA as part of the MF expenditure for entering the Location (the 4-4-7 in P5 is still denied WA by the 4-6-7 in Q5, and therefore cannot prevent the 4-6-8 from claiming WA), it chooses not to do so. If the 4-4-7 (or the 6-2-8 in Q7) First Fires now, the attack will be subject to building TEM. After this the 4-6-8 may still claim WA (since it has not yet completed its MPh) even if not spending additional MF, but if doing so the 4-4-7 may (Subsequent) First Fire subject to the hedge TEM and the 6-2-8 may (Subsequent) First Fire with FFMO (assuming the DEFENDERs haven't exhausted their First Fire capability based on the three MF expended when entering the Location). The 4-6-8 may wait until the APh to claim WA, but if the 4-6-7 in Q5 becomes broken (or leaves) before this, the 4-4-7 in P5 must claim WA (9.323) and will thereafter prevent the 4-6-8 from claiming it.
9.36 HULLDOWN: Any vehicular target fired on by Direct Fire ordnance subject to wall TEM is considered HD (D4.2) instead of receiving the wall TEM. However, if also able to claim in-hex TEM (9.31), the player may choose in-hex TEM instead of HD benefits (D4.2) - after the attack declaration, but before the attack DR is made. If attacked by non-ordnance, the vehicle (but not its PRC) receives the wall TEM (or in-hex TEM). Hedges do not create HD status.
 EX: The PzIII in 43O10 in Bypass along O10/
In its MPh the PzIII starts and enters P9. The T-34 cannot claim WA because it is eligible for in-hex TEM (9.32). Despite the fact that the PzIII has WA (thanks to the PzIV), it is not HD to the KV-IS through the gap in the wall because it is moving (even if it Stops; C.8). The PzIII changes its VCA to P8/
 9.4 MOVEMENT: The cost for Infantry/
EX: See the 9.35 illustration. It costs three MF to move from 55H7 to I8 (1 + [2 x 1] = 3).
9.41 WA is always lost when a unit starts entering a new Location. A unit may not re-claim WA during its MPh if exit of its current Location fails (e.g., A12.15, B28.41, E1.53) unless mandatory WA (9.323) applies.
 EX: It is the German MPh, and both German squads have WA. The 4-6-7 moves to 55H6, and immediately loses WA, allowing the 7-4-7 to claim it. If the 7-4-7 claims WA, it will be able to fire at the 4-6-7 using FFMO (or no TEM if declaring a Snap Shot vs the G6-H6 hexside). If the 7-4-7 does not claim WA, the 4-6-7 automatically gains it when entering H6 (9.323), and therefore receives the wall TEM vs all attacks, even a Snap Shot (depending on LOS; A8.15, 9.42).
The 4-4-7 in H7 now attempts to enter I7, revealing the 3-3-7 and forcing the 4-4-7 back to H7 (A12.15). Even though the 4-4-7 has not left its Location, the WA is momentarily lost, allowing the 3-3-7 to claim it and fire on the 4-4-7 with FFMO, but only if the 4-6-7 did not gain WA in H6.
9.42 VERTEX LOS: During bypass movement (including VBM), and when targeted by a Snap Shot, LOS is drawn to a vertex (two in the case of a Snap Shot against the entire hexside). If such a vertex is part of a wall/
- the LOS is drawn exactly along that hexside (regardless of which of the three hexes forming the vertex, the target unit occupies), or
- the target unit is in one of the two hexes formed by that hexside (C.5), and the LOS enters the vertex via the opposite hex (including its hexsides).
Targets of Underbelly Hits never receive wall/
 EX: The 4-6-7 declares Double Time and bypasses 41Q4 along Q4-R4. For LOS to the Q4-Q5-R4 vertex to be affected by the Q4-Q5 hedge, the LOS must be drawn along the hexside (e.g. from P4), or enter the vertex via the hex on the opposite side of the hedge (e.g. from O5 or from a unit without WA in Q5). The hedge does not affect fire from O4 where the LOS enters the vertex via Q4, or from R4.
The 4-6-7 now expends 2 MF crossing the hedge and bypassing Q5 along the Q5-Q4 hexside. LOS can now be drawn to either the same vertex as before, or to Q5-P4-Q4 (A4.34). If drawn to the former, LOS from P4 is still affected by the hedge, but the target is now in Q5, so hedge TEM is applied from O4, but not from O5 or Q5. For LOS to the Q5-P4-Q4 vertex, the hedge TEM applies from R4 and P3, but not from O3, O4 or O5 since their LOS do not go through Q4.
The 4-6-7 then enters P4 and O4. If a Snap Shot is declared along the O4-P4 hedge hexside, LOS must be drawn to both vertices (as part of the hexside). Hedge TEM applies if LOS is drawn from O5 or P3 (along the hedge hexside), P5, Q3, Q4, Q5 (from the opposite side of the hedge as the unit which is now in O4; A8.15)-but not from N3, N4, O3 or P2. If instead the 4-6-7 entered P3, a Snap Shot would receive the hedge TEM only from O5.
 9.5 BOCAGE: Bocage (or hedgerow) is a special form of hedge grown on top of low earthen mounds to form a natural wall. All rules pertaining to walls [EXC: HEAT NA (C8.31)] are applicable to bocage except as modified below.
9.51 Bocage is depicted by wall/
9.52 LOS: Bocage is a one-level LOS obstacle with a difference. Although a defender behind (but in the Location formed by) a bocage hexside may be in the LOS of a higher level firer, the next hex along that LOS through that bocage hexside is a Blind Hex (A6.4). Treating that bocage hexside as instead being a "Single-Story House" in that defender's hex is a good way to visualize how it creates Blind Hexes vs that higher-level viewer [EXC: The number of blind hexes can be reduced to zero; 9.531]
LOS cannot be traced along a bocage hexspine as can be done with a wall (9.2). A bocage hexspine is treated as a normal one-level obstacle in all respects.
9.521 HEXSIDE LOS: LOS may be traced through a bocage hexside to the hex formed by that hexside, but what can be seen depends on the viewer's status:
- A viewer having WA over that bocage hexside: can see freely through the bocage hexside and any hex beyond it.
- A viewer in a hex formed by the bocage hexside, but without WA: can see through the bocage hexside to the adjacent hex, but not beyond that hex. It can see anything in that hex.
- A viewer not in a hex formed by the bocage hexside: can see through the bocage hexside, to the hex forming that hexside, but not beyond that hex. It cannot see units without WA nor their possessed equipment, but it can see everything else in that hex.
 EX: All hedges are bocage. A unit in 44BB8 can see into (but not through) Z6 to Z8 (thus revealing HIP counters per A12.33), but cannot see units without WA in those hexes, nor see Z5.
If BB8 had a rooftop, a unit there at level 1½ could also see hexrow X and beyond, but not Y6 to Y9 due to the Blind Hex (9.52; i.e., its LOS would be blocked by the "Single-Story Houses" in Z6 to Z8). It could not see Z5 because the Z6-AA6 hexspine is treated as a one-level obstacle for LOS purposes (9.52) creating one blind hex. It could however see the Y5-Z4 hexside and take a Snap Shot vs a unit crossing it.
If it were on level 3, it could see Y6 to Y9 (9.531), but still neither Z5 nor any units without WA in Z6 to Z8. A unit in AA8 can see Z7 and Z8, and with Wall Advantage beyond to Y6 to Y9, but cannot see Z6 or Z9 because LOS cannot be traced along a bocage hexspine (thus also prohibiting Snap Shots from AA8 to hexside Z9-AA9).
 EX: All hedges are bocage.
- The 4-6-8 in 54I5 can see all American-occupied Locations (including the Foxhole), but not the 9-1 nor the entrenched 6-6-7 - nor hexes K3, L3, etc. The 6-6-7 and 9-1 are therefore immune to Direct Fire attacks. If attacking with the MTR, the 6-6-7 in H3 cannot be hit, but the 9-1 in K4 is hit if the 7-4-7 is hit (C3.33).
- The 4-6-7 in J5 cannot see any enemy Location.
- The broken 2-3-7 in H4 can see the adjacent 6-6-7 and units with WA in J3 and K4.
- The broken 6-5-8 in J4 can see all units in J3 and K4.
- The entrenched 6-6-7 in H3 can only see the adjacent broken 2-3-7.
- The 6-6-6 and the 7-4-7 can see all enemy Locations, but not the entrenched 4-6-7.
- The 9-1 can only see the adjacent broken 6-5-8, so he cannot direct any attack made by the 7-4-7 vs other German units, but is still able to direct MC/
TC taken by the 7-4-7 even if attacked by units not in the leader's LOS (e.g., the 4-6-8). - The 3-3-7 can see the 4-6-8, but no other German unit, though it can see the 4-6-7's Location, including the Foxhole. If the 3-3-7 attacks J5 with the MTR, the 4-6-7 cannot be hit since there are no non-hidden enemy units in LOS (C3.33). However, if it declares a WP MTR attack (with +2 Case K; C6.2) and hits the hex, the 4-6-7 must take the WP NMC, because all units in a Location with a WP counter must take a NMC when the WP is placed in that Location (A24.31).
9.53 A non-vehicular Direct-Fire Gun may not both change CA and fire through a bocage hexside in the same fire phase (counting Defensive First Fire and Final Fire as one phase - A.15).
9.531 Elevation advantages (9.33) have no effect on the TEM of bocage but can reduce the number of Blind hexes caused by bocage hexsides to zero, as per A6.42. The number of blind hexes created by a bocage hexspine cannot be reduced below one.
9.54 MOVEMENT: To cross a bocage hexside costs Infantry two MF plus COT. No other unit may cross a bocage hexside except a fully-tracked AFV. An AFV crossing a bocage hexside cannot use Reverse-movement/
 9.541 BREACH: A Dozer tank, bulldozer, or AFV designated by SSR as being equipped with the Culin hedgerow device or similar equipment (after 7/
 9.55 CONCEALMENT: An Infantry/
 EX: All hedges are bocage. By SSR the German player (who sets up first) is allowed to set up = 2 squad equivalents using HIP. He hides a squad in 55R1 and hides two HS in Q1 and Q2 (shown with red borders) despite being non-Concealment terrain, because they have = 1 bocage hexsides. He also uses two OB-designated "?" for a dummy stack in R2, which is allowed for the same reason.
The British player sets up a 4-5-7 in S1, with LOS to Q1 and R2 through non-bocage hexsides, so the 2-3-7 is placed onboard unconcealed and the dummy stack is eliminated when the British setup has been completed. The squad in R1 remains hidden due to being in an orchard hex.
During the British MPh, the 6-4-8 moves to Q3, thereby forcing the hidden 2-4-7 to be placed onboard beneath "?".
 EX: All hedges are bocage. It is the British PFPh and the 6-4-8 in 54K4 prep fires against the 4-6-7 and breaks it. A lone broken unit cannot claim WA (9.32), even in a hex where mandatory WA (9.323) otherwise applies; the 4-6-7 therefore loses WA and disappears out of LOS from both British units, making it immune to further attacks.
During the British MPh, the concealed 3-3-8 uses Non-Assault Movement and enters K4 without claiming WA (due to the woods TEM), and is therefore out of the 4-4-7's LOS. It continues to L4 where it must claim WA (9.323), thereby moving within the 4-4-7's LOS, but still retaining Concealment since the movement is treated as Assault Movement for "?"-loss purposes (9.55). Similarly, the 3-3-8 would not lose Concealment by entering/
(If there were a German 2-4-7 in L5 with WA, the 3-3-8 could not claim WA when entering L4. WA is claimed per hex, not per hexside [EXC: Deluxe ASL] and the German 2-4-7 having WA over the L4-L5 hexside is enough to prevent the 3-3-8 from claiming any WA at all in L4. In this case the LOS from the 2-4-7 would not receive bocage TEM, so the 3-3-8 would lose "?" and be subject to FFMO from the 2-4-7, but would be out of LOS from the 4-4-7 in K6, and therefore immune to attacks from it.)
At the start of the German DFPh, the 6-4-8 drops WA (which he could have done anytime after firing [9.322]), thereby disappearing from the 4-4-7's LOS. So the 4-4-7 instead fires its MMG at the concealed 3-3-8 which cannot drop WA. A PTC is rolled, forcing loss of the 3-3-8's "?".
 At the start of the British APh, the situation is as shown to the right. During its APh the 6-4-8 claims WA again (which was the earliest it could do so [9.322]). At the end of the British CCPh, both British MMC gain "?" since all enemy LOS is traced through bocage hexsides (9.55).
At the start of the next German Player Turn, the 4-6-7 rallies and immediately gains WA (9.323). The British 6-4-8 then forfeits WA again to avoid German Prep Fire. During the German MPh, the 4-6-7 Assault Moves to K5 where it is prevented from claiming WA by the 3-3-8 in L4. The 6-4-8 cannot re-claim WA at this point, so its attack against the 4-6-7 receives the +2 bocage TEM, while fire from the 3-3-8 receives FFMO. If the 6-4-8 and 3-3-8 formed a FG, the attack would receive +2 bocage TEM and no FFMO.
 EX: All hedges are bocage, and Deluxe ASL rules are in effect. For purposes of this example, white WA markers represent the situation after the British Infantry moves, and light pink markers (as well as the Carrier wreck) represent the situation at the end of the MPh. A German 6-5-8 squad in gM3 has WA over all 4 wall and hedge hexsides.
A British 4-4-7 squad enters L3 and claims WA over L3-M4, L3-L2, and L3-K3, while the German squad retains WA over L3-M3. The British squad has no LOS to any non-adjacent hexes where the LOS crosses the L3-M3 hexside inclusive of vertices; e.g. M2, N2, and N3 (9.521).
A British Carrier moves into L2 and then into M3 forcing the German squad to lose all WA as soon as its Location becomes occupied by an armed enemy unit (9.32). The British 4-4-7 automatically gains WA over L3-M3 as soon as all enemy units have lost WA (9.323).
The German squad eliminates the vehicle and its crew with CC Reaction Fire, and immediately regains WA over M3-L2, M3-M2 and M3-N2 (9.323). If in-hex TEM were available, it could not regain WA over those hexsides until the following RPh (9.322). In either case, if it manages to break the British 4-4-7 in Final Fire, the broken British loses WA per 9.32 and the German squad automatically gains WA over L3-M3 (or could voluntarily claim it if in-hex TEM were available).
9.6 HILLSIDE WALL/
9.61 LOS: A Hillside wall/
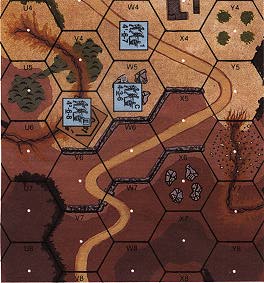 EX: The 4-6-7 in 25W4, the 4-3-6 in W5, and the Crest-status 4-6-8 in V5 all have a LOS across one or more wall hexsides/
 9.62 ELEVATION, TEM & WALL ADVANTAGE: A Hillside wall/
 EX: The 4-6-7 IN 25B4 can claim neither hexside TEM vs, nor Wall Advantage over, the 4-5-8 in B5, nor can it claim hedge TEM vs the 4-5-7 in C6; however, the 4-5-8 could receive such benefit, and the 4-5-7 could claim hedge TEM, vs the 4-6-7 because both British squads are directly behind, and at the same level as, a Hillside hedge (hexside C5-C6 in the case of the 4-5-7).
(If the 4-6-7 were in crest status with its center protected Crest hexside at B4-A5 or B4-B5, then it could, if having Wall Advantage, claim hedge TEM vs the 4-5-8/4-5-7 since it would be at the same level as, and directly behind, the hedge. If it claimed Wall Advantage it could not also claim entrenchment TEM vs the 4-5-8 [B9.31], but if it did not claim Wall Advantage while in crest status, the 4-5-7's attack vs it would still be affected by the B4-B5 hedge TEM [B9.3]. Regardless of whether or not the crest 4-6-7 claimed Wall Advantage, the 4-5-7's attack vs it would not be affected by entrenchment TEM [B20.92].
Neither the 4-6-8 IN C5 nor the Crest-status 4-4-7 in C5 can claim hedge TEM vs, or Wall Advantage over, the 4-5-7 because both German squads are lower than the C5-C6 hedge's base elevation. If the hero in B6 attacks the C5 Germans, the 4-4-7 (but not the 4-6-8) can claim the B5-C5 hedge TEM (B9.3). (The C5-C6 level-one hedge cannot affect that attack by the hero.)
Provided neither the 4-5-8 nor the 4-5-7 were already marked with a Wall Advantage counter the 4-4-7 could claim Wall Advantage over the B5-C5 hedge even though it cannot claim it over the higher-level C5-C6 hedge.
If the 4-5-8 fires at the Crest-status 5-4-8 in D5, the latter cannot claim hedge TEM since it is a level lower than hexsides C5-C6 and D5-C6.
9.7 CACTUS HEDGE: A SSR may specify that walls/

